I am writing a new setup guide because the old one is a little dated now, things have gotten easier and I want anyone new to be able to easily get started with Raspberry Pi’s. They are much more than just toys, you can do all kinds of cool things with Raspberry Pi’s these days such as setting up a plex server or creating a hacking appliance. The uses are almost endless! So let’s get started with our Raspberry Pi OS setup guide!
Downloading The Required Imager
The creation of the Raspberry Pi Imager has made this entire process much easier. We are going to go ahead and grab a copy it can be found at this link or you can download it directly at this link. Follow the simple installer steps and it will be ready to use in no time.
Lets Get To Installing
Before anything else insert your SD card into the SD slot on your computer, if your computer does not have one you can find USB adapters on Amazon and other retailers. Once the SD card is inserted into your computer your can open up the Raspberry Pi Imager.
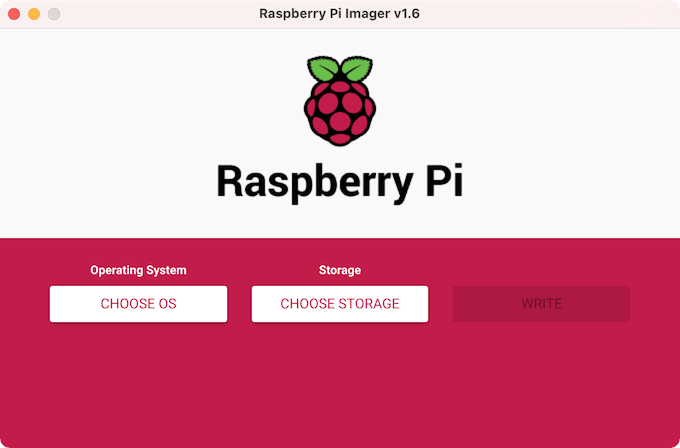
You will be presented with three white buttons ‘Choose OS’, ‘Choose Storage’, and ‘Write’. First, we are going to be clicking on Choose OS this guide will only cover how to set up Raspberry Pi OS the others will require a different setup. Since I don’t plan on using a monitor (headless) I will be selecting ‘Raspberry Pi OS (other)’ and then ‘Raspberry Pi OS Lite (32-bit)’. The light version has no desktop graphical user interface.
We have our operating system selected now we need to select our storage by clicking the ‘Choose Storage’ button and selecting your SD card.
All you have to do now is click ‘Write’, then yes, and wait for the process to complete. After the program is all complete you will have to click ‘Continue’ and remove the SD card and stick it back in the software ejects it for you.
Setting Up WiFi for Headless Raspberry Pi
Open up Notepad (not Notepad++ or anything else plain old notepad) we are going to create a file called “wpa_supplicant.conf” we are going to save this in the boot partition of our SD card. You can find the boot partition of your SD card in “This PC” as seen below.

As you can see mine is the E drive so I will be saving my file inside there. If you see a folder called ‘overlays’ you are in the right location! The contents of the file will be a little different for everyone as it contains country, Wi-Fi network name, and Wi-Fi network password. It should look something like this:
ctrl_interface=DIR=/var/run/wpa_supplicant GROUP=netdev
update_config=1
country=US

network={
 ssid="Your WiFi Name"
 psk="Your WiFi Password"
}
If you are not in the US you will need to change ‘country=US’ to your local country code. You will also need to change ‘Your WiFi Name’ and ‘Your WiFi Password’ to your network login information. Make sure you save the file inside the boot partition and name it “wpa_supplicant.conf” (adding the quotes will make notepad save it without adding the txt extension to the end).
Setting Up SSH for Headless Raspberry Pi
Using notepad like before we are going to make one more file called “SSH” in the same boot partition as we created our wpa supplicant file. This file is going to have nothing inside it, it just needs to exist so when booting the Pi knows to enable the SSH server by default so we can access our Raspberry Pi from our PC.

Work Complete!
That’s it! You can now safely eject your SD card and insert it into the SD card slot on your Pi, add power, and wait a few moments for everything to set up and connect. Hope this guide was helpful!
